|
Let's make mini-sized pan
Thank you to Kaj, Joel, Jurius, and Novo to advice me. You gave me plenty forces.
The Plan
1. Prepare the Tin drum (20 l. size), hammer, and others.
2. Sink the drum.
3. Design the notes
4. Make the shape of outer notes.
5. Make curve line smooth hitting between and around notes.
6. Even out the uneven surface between the inner notes.
7. Cut the skirt at 7-8cm length.
8. Make the hole to suspend
9. Tune
1. Prepare the Tin drum , hammer, and others.
Prepare the Tin drum .(20 l. size)
Select the 20 l. size tin can, like which had been used for oil or paint. It does not have to be thick like a real steel drum. They may be standardized, so I think they don't have much difference at diameter. It's not problem if your drum has some difference. You can make your own pan with whatever size. In my case, the diameter was 27.5cm(10 and 3/4inches) on the bottom.
*When they make real Pans.
When they make real Pans, they use ordinary 200 l. steel drum. (The diameter is 58cm/ 23inches.) The bottom side will be hit and sunk, so It's better to not damaged on the bottom surface and edge. The drums which have no damaged on the skirt are better. The drums which had been used for chemicals are sometimes no good because the steel could get corrosion. In these cases, when you hit the surface gets cracks easy, or chrome does not adhere to surface well.
About the thickness, the tuners select what they like. I like thick ones, for instance 18 gauge. If you like the Pans that are called SOFT PAN, they will choose a thinner gauged drum, like 22 gauge.
Prepare the hammer.
Select a hammer that you can use for a long time without getting too tired. A 200-500g hammer is good for a tin drum. If you find hammer with a plastic head, it might be easier to grind the head round.
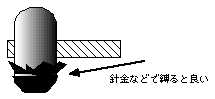
1. Grind round the hammer head
The hammer's surface should be rounded to avoid damage to the pan surface. A small scratch on the surface will sometimes grow as you continue to work the surface to sink or get it smooth. To eliminate damage, make the hammer's surface round as possible. To use the masking tape on the surface of rounded hammer is more better. Since ordinary steel head hammer will be hard to grind, you can select plastic headed hammer which can be filed with an ordinary rasp.
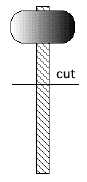 2.Cut the handle of hammer
Cut the handle of hammer so that when you hit the inside of bowl (Pan), the grip does not hit rim and obstruct your work. Cut the handle at the point just below where you can grip it.
*When they make real Pans.
 Around 6 pound hammer will be used to sink the drum. The hammer will be ground rounded, and polished to make it flawless. Another way instead of to polish is attach the rubber seat on the surface of hammer head. In this case, you do not have to worry about getting scratches on the Pan. Some tuner use the ball for shot-putting. I don't recommend this way for amateurs to make pans, because I have never tried to use that method.
In smoothing and tuning, they often use 2.5-3 pound (about 1-1.5kg) hammer. Most of the time, the hammers are rounded and attached with the masking tape instead of rubber seat.
 tighten up with wire.
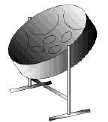
 Make a stand
Steel pans need a stand to hang on while playing. Mini-pans from tin cans are light, so the stands don't have to heavy duty. Vinyl chloride (PVC) pipe for waterworks will be easy to make and are strong enough. Make a stand like the figure, and make a hook on top of pipe. (The Pan needs a ring.)
*When they make real Pans.
Two cymbal stands work. Hang the pan between the two stands for the easiest method. For more stability, use the rack kit (like ANGLE) then make big one like mini-pan stand.
 Make sticks
Cut a stick that have 6mm-10mm thickness at around10cm (4inches). If it cut too long, the stick end will obstruct your playing.
Attach the rubber on the head. Using rubber tube is easy, but you won't get the right thickness and hardness. Let's make Trinidadian style sticks that you can adjust hardness and thickness.
Purchase an ordinary rubber grove (perhaps from a grocery store). In Japan, I favor [Super Thin natural rubber grove] from DUNLOP. This is good for Mini-pans. I can't suggest vinyl gloves since it is not elastic enough, and sounds too hard.
Cut into flat strips (1.5cm / 1/2 inch in width). Wraps the rubber strips around the stick. When you wrap the rubber, you can adjust the hardness by amount you stretch the rubber. Five to six wraps will be good to mini-pans, but of course it can changed depending on the type of Pan, thickness, weight, hardness, of sticks, thickness, hardness of rubber, and your favorite.
Wrap the rubber down along the grip and finish by cutting off the surplus and fitting the end under the last wrap.
*When they make real Pans.
What kind of stick, thickness, weight, length, hardness, and thickness of rubber, everything are according to the player's choice. So you can make your own sticks. Rubber tube are also used for real Pan.
2. Sink the drum with hammer.
--SINKING
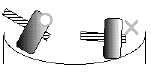 The hammer should be used at right angle to the surface of drum when you are beating. Slanting of hammer's angle will make unbalanced hitting and can cause damage and cracking. Try to make circle mark on the drum every time you hit.
Sometimes the surface around the hit point would bulge up suddenly. Hit gently on bulge to sink it down. Hard hits on bulge are the main cause of cracks due to the tearing of metal. When the bulges are evened out you can continue sinking.
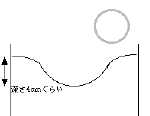
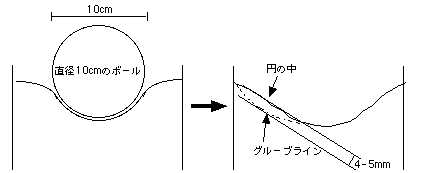
Make a hole (dent) that a ball with a 10cm or 4inches diameter can fit into. Then get decrease the striking angle to make outer notes. See figure
note:
Take good care of your fingers while pounding the pan surface. Do not hit your hand on rim. This is very easy to do, but I have seen so many smart amateurs make this mistake by too much concentrate.
1. 2.
2. 3.
3.
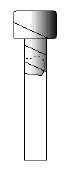
*When they make real Pans.
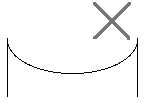
This way to make pan (figure 1) was way to make Real DOUBLE TENOR PAN or DOUBLE SECOND PAN. When they make Real SINGLE TENOR PAN, they sink 6.5-7 inches (16-18cm) at one time. ( figure 3)
3.Design the notes
--MARKING
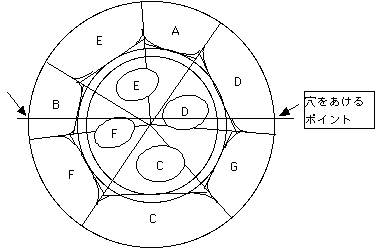
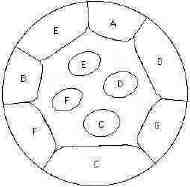
There are many ways to position the notes. Let me introduce you to this positioning. (See figure under) arranged 4th and 5th style. This positioning is one that is becoming standardized these days. The 4th and 5th style is very sophisticated style in Musical Theory and some tuners say it is easy to tune.
*When they make real Pans.
*in the case when they make real pan. Positioned 'F#', 'C#', 'G#', 'Eb', and 'Bb' right side of 'B', then come back to 'F', 'C', 'G'. It's same as 5th circle. For children or students, this method is good when studying music because it allows for a natural understanding of musical theory. What do you think, Miss and Mister Music Teacher?
 4. MAKE SHAPE OF OUTER NOTES
I use the word "outer notes" for notes located on the outside just inside the rim. For the inside there are 4 notes I call "inside notes."
Outer notes can be made with hitting groove line to get angle down. Inside of notes will be left angle and having smooth arch shape, (not too high, just a little bit).
5. Make curve line smooth hitting between and around notes
--SMOOTHING
After you make the shape, hit on groove line and around inside notes, to allow notes to ring independently.
At last, every note has a smooth and thin arch. How high, how big and how tensioned will make the sound. If the partition (groove line and around the inside notes) is made to be one smooth curve, then each note will sound independently.
Don't hit the surface hard, light and continued hitting will make a real smooth surface. The hollow made in sinking, will disappear.
The inside of the notes will arch higher. If it has a outward curve, hit that spot to make it 'smooth'.
*When they make real Pans.
STEP 4.In smoothing, they use 2.5-3 pound (1kg-1.5kg) hammer. For the next step, grooving, smoothing is very important.
6. Hit around inside place to make perfect surface and curve.
--SMOOTHING
 When you make it perfect curve, there is close to no sound when you hit around the inside notes. Try it. Sometimes the smooth line you made in step 4, will get damaged. Make it smooth to inside.
*When they make real Pans.
After step 6, smoothing, next is grooving. Make the groove lines with a flatted punch and light hammer. This is grooving. The groove will make the notes sound more independently, and it also works too see where the notes are after the drum has been chromed. After Grooving, they will need smoothing again. So, smoothing will need to be done before and after grooving. The depth will be 0.5 -1 inches more. Not only do you need to smooth twice as mentioned previously, but it is also important to smooth while tuning to get good sound.
7.Cut the skirt.
--cutting
The skirt is the side of the pan. With the mini-pan, 7-8cm (3inches) is a good length at which to cut the skirt.
A deep skirt will make deep echoes, but in this size, the size of the skirt does not make as much difference. You don't have to cut skirt, unless you have trouble tuning the pan.
After cutting, sand the edge with sand paper or rasp for safety.
*When they make real Pans.
Many single tenor pans have skirts cut at 5-6inches (13-15cm).
 8. Make holes to hung the pan
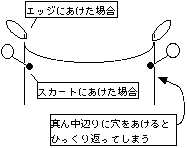
Looking at the 'c' note, position that note to your side. Hold right and left side with your both hands, and hold it up. Be sure to hold it at an angle so that the pan faces toward you. Move the position of your hands away a little bit to get the desired angle. See 'c' note is your side. The points where your hands are holding are the points to make holes.
Use a drill to make the holes in the edge of the pan. You can make the holes on the skirt, but do not make it too far from the edge or the pan will loose balance and the hanging angle will change.
Take rasp to make the holes safe.
*When they make real Pans.
The angle greatly affects playing. You have to be careful of where you position the holes. Try to make the holes in a place where there are not any notes to not effect the tuning.
In the case making real Pan, before the tuning, they burn the pan in fire. they call it tempering.
9. Tune
--tuning
This step will take longest, if you want a good sounding pan. Make arch higher by hitting from underneath, note will get high, and make arch low by hitting from top, note will get low. This is the first basic theory of tuning.
Start with one note. Don't try several notes at one time. You might get confused.
From underneath, push it up with stick head, or hit gently with hammer. Don't strike the note too hard and don't hurry. Take it easy and listen to the sound while hitting. Remember to keep the shape of 'smooth curves' around the notes. Can you hear the note goes up?
Then, gently hit the arch from top. Be sure to make the arch go up to smoothen.
Is sound going down? When you find the right pitch you want, stop hitting. This note is o.k. You may need to change from hitting underneath and to over several times to get the right pitch.
If the note goes up over the pitch you want, when you make pitch down by hitting from top, tap from under the pan and until the arch goes up, again. Then tap from top. You will find the pitch can get more down than the last time.
When you find a very good sound (good octave or harmonics make nice sound) but pitch is too low, tap around the note from top same as smoothing. Sometimes fundamental note goes up, and harmonics are stay. In another case, every notes go up same time. You will find theory of sound moving.
Hit note by stick to check the sound, then by hammer, and by stick again. To make note a good pitch, you have to tune the other notes around the note you tuned. After several times you go around pan, the sound will be better.
You need patience to tune steel pans. When you feel tired, take break and try again later. Don't hurry, take it easy, it is best way to learn tuning.
*When they make real Pans.
A good pan will be tuned to, not only the fundamental notes, but also harmonics, 1st octave, sometimes 2nd octave, and sometimes 2nd harmonics in one note. In single tenor pan, to blend 28 or 30 notes, the tuner will tune 90 -150 notes in a pan.
I can't explain exactly about tuning with words. If you are interested in leaning more about tuning, read Mr. Ulf Kronman's book, "Steel Pan Tuning" or in West Virginia University, USA, a great tuner, Mr. Ellie Mannette, has a course for tuning and making steel pans.
Experience is most important aspect of tuning technic. To make plenty of pans
might make you good tuner.
After tuning, pans go to chroming factory. After chrome, the pan will get fine tuning. This is last stage. These days, it is hard to find painted tenors. Of course paint will works to prevent rusts.
COMPLETION
Well done. It was hard to make musical instruments, isn't it? How about your pan? Does it sound good? Warm or bright? It is your original sound. Nobody can make imitation of your sound. You can play songs you learned in school. Practice and play for your family and friends. They will be surprised.
Don't hit too hard when you play, because the pan might go out of tune. Playing gently will make gently sounds.
Real steel pan made from steel, so chromed for prevention of rusting. I think your pan from tin can will not so rust. If you worry, spray the paint, not too much. Another option is to spread machine oil on it and wipe it off until it doesn't feel greasy.

HOME
E-mail address is..
soo@curepe.net