ZURASHI-KUN Overview
( Vertex Slider for Low-Poly modelers )
[ Japanese description ] is in below part of this page.
[ 日本語の説明 ] はこのページの下のほうにあります。
< English Part >
ZURASHI-KUN [ Vertex slider for Low-Poly modelers ] can move a vertex T on the edge AB, along the edge AB .(Fig.1)
| Fig.1 |
Fig.2 |
 |
 |
In Fig.2-1, when the edge A-T0-B is not a straight one, ZURASHI-KUN moves T0 to T1 on straight line between A and B in Fig.2-2 first, and then slides T1 along the edge AB.
ZURASHI-KUN requires selecting three vertices. One is you want to move(T), the others are for define a edge (A and B) .
Fig.3
In ZURASHI-KUN, a vertex you want to slide is called as "Target", and two vertices that define an edge referred by the Target are called as"1st-End" and "2nd-End". (Fig.3) It is swappable specifying 1st-End and 2nd-End.
Fig.4
When you want to move the edge AB to A1B1 as shown in Fig.4-1 and Fig.4-2, and you move AB merely, it results A2B2 shown in Fig.4-3. If you want to get A1B1 from AB, the vertex A is required to move along the edge CD. To utilize moving a vertex along the edge it is on, I decided to make this plug-in, ZURASHI-KUN for Low-Poly modelers.
Fig.5
New feature! UV editing!
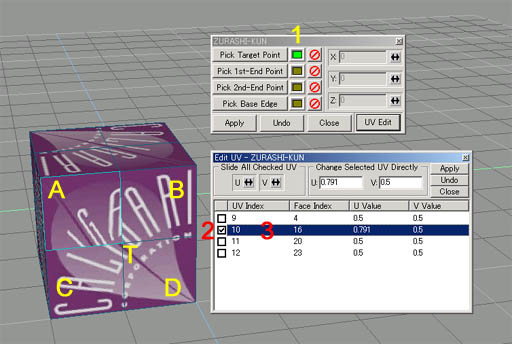
In version 2, ZURASHI-KUN now has UV edit feature. Moving a vertex may be caused texture distortion. This feature will solve this problem. ZURASHI-KUN can do UV Editing with only Target is selected as shown in 1 of Fig.5. From this, you can use ZURASHI-KUN as a UV retouch tool.
Usually a vertex is contained by some faces. Because of this, a vertex has its face number of UV values. ZURASHI-KUN shows all UV entries owned by Target vertex in the list 3 in Fig.5. Checkboxes(2 in Fig.5) determines UV entry that will be manipulated. When you select an UV entry in the list 3 in Fig.5, ZURASHI-KUN shows a face related to selected UV entry (A in Fig.5).
Fig.5 shows that you selected T as Target, checked second UV entry, selected second UV entry, and ZURASHI-KUN showed related face A, manipulated U value only in face A.
You can manipulate UV values also from keyboard. CTRL+Cursor-Left(Left arrow) or CTRL+Cursor-Right (Right arrow) change U value 0.001 to every key press. CTRL+Cursor-UP(UP arrow) or CTRL+Cursor-Down(Down arrow) change V value 0.001 to every key press. When you press this keys with shift key, UV value will be changed 0.01 to every key press.
< Japanese Part >
「ずらし君」は、図1のように、辺AB上にある点Tを、ABに沿って移動させることのできるツールです。
| 図1 |
図2 |
|
|
図2の1のように、辺A-T0-Bが一直線でない場合は、T0の位置をAとBを結ぶ直線上の点T1に移動させて、それからAB上を移動させます。
ずらし君では、まず移動させたい点を選択しますが、そのほかに、その点が動く直線を決める点(上図ではAとBの2個)を選択する必要があり、合計3個の点を選択してから移動の操作を行います。
図3
ずらし君では、ずらしたい点Tを「Target」、Targetをずらす辺を構成する頂点2個をそれぞれ、「1st-End」、「2nd-End」と呼びます(図3)。「1st-End」と「2nd-End」の指定は、逆になっていてもかまいません。
図4
図4の1のように、辺ABを矢印の方向に移動して、図4の2のようにしたい時、単に移動させると2ではなく3のようになってしまいます。2のようにするには、頂点Aを辺CDに沿って移動させる必要があります。この機能を実現するため、「ずらし君」を作成しました。
図5
新機能!UV編集
バージョン2では、新しくUV編集機能が追加されました。頂点を移動するとテクスチャがひずんでしまうことがありますが、この機能を使うと手動ですがひずみを元に戻すことができます。ずらし君では、図5の1のように、Targetだけを選択した時点でUV編集が可能になります。したがって、ずらし君をUVレタッチツールとして使うことも可能です。
通常1個の頂点は複数の面に属しているため、その面の数だけUV値をもっています。選択した頂点が持っている全てのUV値が、個々のエントリとしてUV編集ウィンドウにリストされます。どのエントリを操作するかは、2のチェックボックスで選択します。また、3のようにリストを選択すると、そのエントリが関連している面(図ではAの領域)が図示されます。
この図では、頂点Tを選択し、領域Aのに関連したUVエントリにチェックすることでAの部分だけのUV値を変更しています。
UV値の変更はキーボードからも行えます。Ctrlキーを押しながらカーソルキーの左右を押すとU値が、Ctrlキーを押しながらカーソルキーの上下を押すとV値がそれぞれ0.001ずつ増減します。Ctrl+Shift+カーソルキーで、UV値を0.01ずつ増減できます。
[ Return to Plug-ins page ]
|